Cracking the Code
How Ignition Drawing Perfected a Complex Puff Embroidery Project
At Ignition Drawing, innovation is more than just a buzzword—it's the driving force behind everything we do. From perfecting techniques to prevent potato chipping on stretchy fabrics, to elevating the quality of puff embroidery, we are committed to continuous improvement. Our latest project is a prime example of this dedication to embroidery innovation.
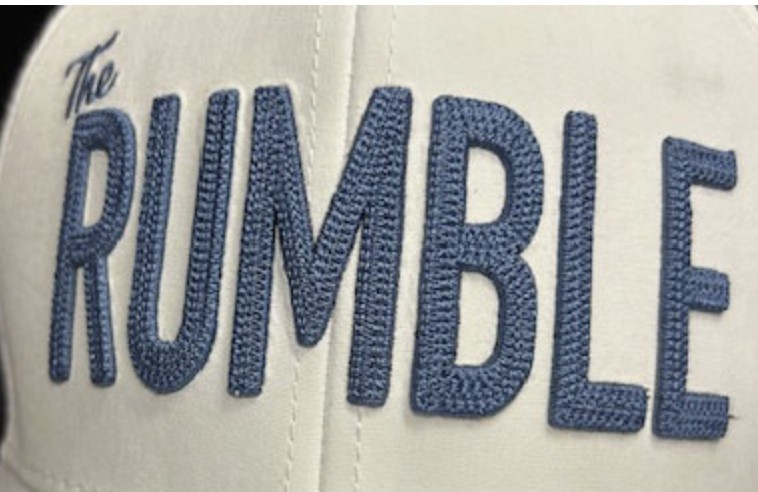
The Challenge: Replicating a Detailed Puff Embroidery Pattern from a Single Photograph
Recently, our long term friend Kevin Price, President of RB Digital presented us with a challenge, and we knew it was an opportunity to showcase our expertise. The task was to replicate a complex embroidery pattern using only a photograph as a reference. Despite the limited reference material, we were eager to take it on and deliver outstanding results.
Solution: Experimenting with Techniques
Our journey began with experimenting in Wilcom© software, exploring various styles to achieve the desired effect. Our initial approach involved using a fill pattern. However, we quickly realized that the overlapping threads at different angles made this technique impractical with standard methods. This led us to pivot and develop a new technique—layering a pattern over a puff satin stitch.
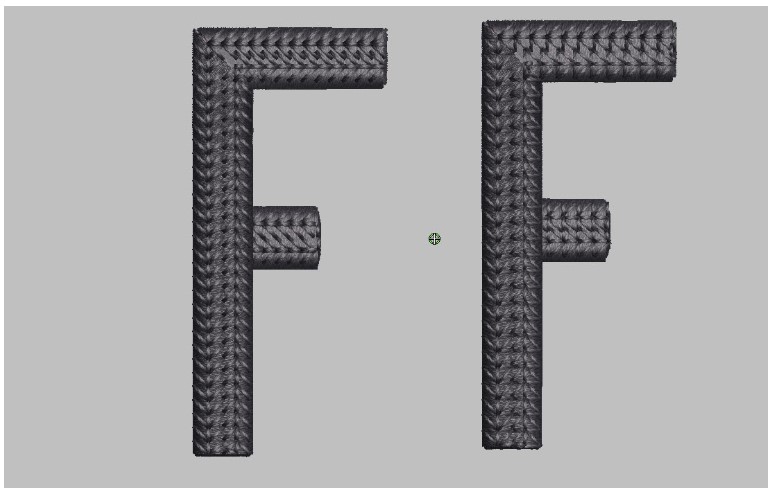
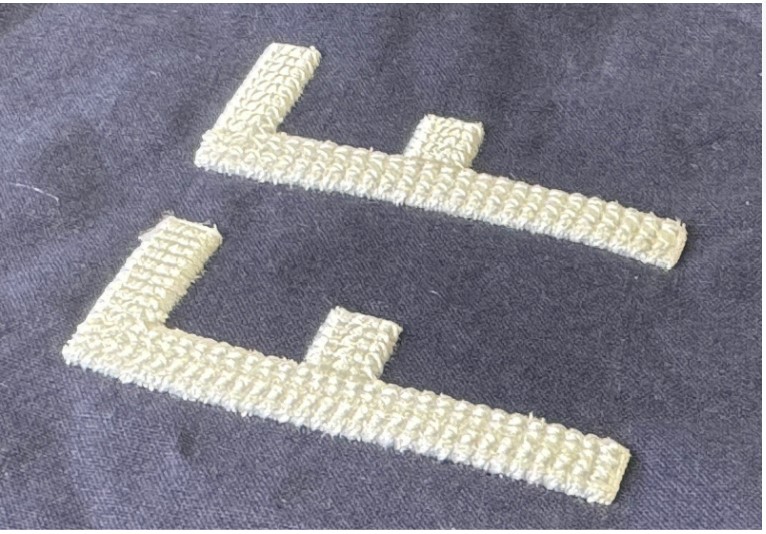
Crafting a Custom Motif
To replicate the intricate top stitch pattern, we tested two motifs: one that was pre-existing and another that we custom-designed specifically for this project. After sewing out the sample, the results were impressive.
While both motifs were successful, the custom-designed one (bottom) more closely matched the original design, marking a significant win in our creative process.
Delivering Excellence, Quickly
Once we achieved the perfect sew-out, we promptly shared images of the finished product with our client and provided a DST file for them to test in their own shop—all within just a few days. This speed and precision highlight our commitment to exceeding client expectations.
Key Guidelines for Success
The pattern we created is specialized and will not apply to most general embroidery projects, but we’re proud to have cracked the code on its creation. However, for this pattern and other designs like this, it was essential for us to consider:
- The Surface: Best suited for flat surfaces or hats with two front panels sewn before construction.
- The Width: The column stitch must maintain a consistent width for optimal results.
- The Foam Color: The foam color should always closely match the top stitching
Given the complexity of this pattern, attention to these details was key to achieving the desired outcome.
Pushing Boundaries with Every Stitch
At Ignition Drawing, challenges like this fuel our drive for innovation and excellence. We’re passionate about pushing the boundaries of embroidery, one stitch at a time.
If you’re facing a challenging embroidery project or looking to elevate the quality of your designs, let Ignition Drawing help you achieve exceptional results. Reach out to us today to see how we can quickly bring your vision to life with precision and innovation.